03- Windows 2008 R2, DNS & Active Directory
In these notes, we will start with the stock install of Windows 2008 R2 Datacenter (x86-64) provided in the classroom laboratory. That machine was built from the MSDNAA .isos (available to the students in class) using the default installation.
The default created user is “Harry Seldon” with the usual class password of “password1!”. The system is set up to automatically have that user log in with that password.
Computer Information
Follow the instructions in 00- System Setup to get your system started. In this example, we set up the system as follows:
- IP Address: 10.0.2.200
- Netmask: 255.255.255.0
- Gateway: 10.0.2.254
- DNS: Unconfigured (for now)
- Host Name: Giskard.class.tu
- Domain / Workgroup: Unconfigured (for now; defaults to WORKGROUP)
One thing left unmentioned in the setup document- we did not set the password for the administrator account; it is currently blank!
I would reset that before proceeding.
DNS & Active Directory Install
Select “Add Roles” from Initial Configuration Tasks. We will install both our DNS Server and our Domain Controller on the same host. We can put these on separate hosts if we wish. If you do, then be sure the DNS is built first.
Select Active Directory Domain Services only- I have found it simplest to start with just the domain services and add the DNS server later. Begin the install. You will get a prompt to install Microsoft .NET Framework 3.5.1; accept it.
When the install completes, you will be given a screen like the following:

As our next step, we want to run the Active Directory Domain Services Installation Wizard (dcpromo.exe). You can do this from the hyper link on that screen, or you can run it directly from a command prompt.
In this guide we will not use the advanced mode installation. Because this is our first domain controller and we are starting from scratch, we will create a new domain in a new forest.
We set the FQDN of the root domain to class.tu, as our host is named giskard.class.tu.
Because we are going to be doing a lot of mixing and matching in the class, we select Windows Server 2003 as our Forest functional level and our Domain functional level.
At this point, we will be asked to select additional options for this domain controller; the DNS Server option will be checked. Accept this.
As part of the process, you will receive a warning:
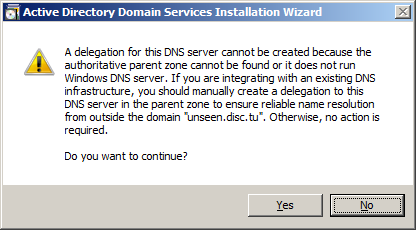
Since we are working in our classroom laboratory environment, we will not need to resolve names outside our domain; thus we can accept this warning and proceed.
The locations of the Active Domain Controller database, log files, and SYSVOL can be kept in their default states.
Select a solid password for Directory Services Restore Mode (certainly something better than I chose, which is, of course, “password1!”).
Go ahead and complete the install; this will require a system reboot.
DNS Configuration
Let’s add some entries of some Windows machines to our DNS Server. We won’t need the Initial Configuration Tasks window for this purpose; you can close it out. It will be replaced with the Server Manager program which can be used to launch most of the tools we will later need.
Start by running the DNS Manager on the server. You can find this by navigating Start → Administrative Tools → DNS. The same functionality is also available in the Server Manager; just navigate through the panel on the left side Server Manager → Roles → DNS Server → DNS.
Expand the Host name (in my example, it is called Giskard), then expand out the tree for Forward Lookup Zones, then the name of your domain (in my example, it is class.tu) to obtain something like the following:

Right-click in the panel on the right, and select “New Host (A or AAAA), and provide both the hostname and the IP address. In this example, we will set daneel.cosc.tu to 10.0.2.201.

We can verify that our entry was added to the DNS server from the command line:
Microsoft Windows [Version 6.1.7600]
Copyright (c) 2009 Microsoft Corporation.  All rights reserved.

C:\Users\seldon>nslookup daneel 10.0.2.200
Server:  UnKnown
Address:  10.0.2.200

Name:    daneel.class.tu
Address:  10.0.2.201
Note however, that the reverse lookup fails; if we ask the nameserver at 10.0.2.200 for the hostname that corresponds to the IP address 10.0.2.201, it will fail with an error:
C:\Users\seldon>nslookup 10.0.2.201 10.0.2.200
Server:  UnKnown
Address:  10.0.2.200

*** UnKnown can't find 10.0.2.201: Non-existent domain
The reason for this is that we have not yet specified the corresponding reverse lookup zone. Return to the server, and click on the Reverse Lookup Zones entry in the navigation panel; you will find that there are no zones present.

Right-click on Reverse Lookup Zones, and select New Zone to launch the New Zone Wizard. You want to create a primary zone, and store the zone in Active Directory. Replication can be as broad as you wish; in this example we will accept the default and replicate to all DNS servers on domain controllers in the domain. Create an IPv4 Reverse Lookup Zone for your network. In this example, we will set up a reverse lookup zone for the 10.0.2.0/24 subnet.

Notice how we did not have to manually specify the ".in-addr.arpa." component of the address, as we simply specified the Network ID.
Continuing the install, we will be asked about dynamic updates. We will not discuss dynamic updates for the DNS server; in fact we ignored the issue completely when we discussed BIND on Linux; feel free to accept the default and allow only secure dynamic updates.
Let the process complete, then open up your new reverse domain; in my example it is named 2.0.10.in-addr.arpa. Right click, and select New Pointer (PTR) and add pointer records for every host you added earlier- and this included the domain controller itself.

Conveniently, once the Reverse Lookup Zone is created, you can add both the address record (A) and the pointer record (PTR) in one step. Simply check the box “Create Associated pointer (PTR) record” when you create the address in the forward lookup zone:
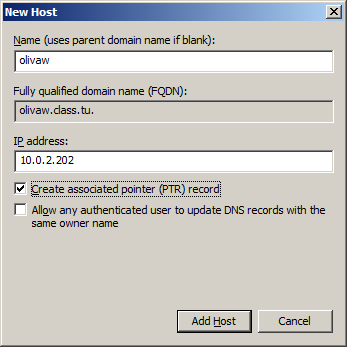
Once this is complete, your nslookup attempts should proceed without error:
C:\Users\seldon>nslookup olivaw
Server:  localhost
Address:  ::1

Name:    olivaw.class.tu
Address:  10.0.2.202
DNS Forwarding
As was the case with BIND we need to be able to forward requests for other namepsaces to the correct nameserver(s). We can do so using Conditional Forwarding. From the DNS Manager, select Conditional Forwarders in the navigation tree, then right-click and select New Conditional Forwarder.
In week 2, we set up a BIND server for the domain .cosc.tu on the IP 10.0.2.2. We set the DNS domain as cosc.tu and the IP address to receive the forwarded queries as 10.0.2.2.

Because we have not included the .cosc.tu namespace in our server, and because there is no root nameserver, the Windows system is unable to validate the BIND server’s FQDN; this is expected.
Set up your Windows 2008 server to correctly forward queries to your BIND server from week 2.
Verify everything works as it ought to. Start be setting up another host (say a Windows host) to use your new server for DNS. Verify that it can resolve both names and numerical IP addresses from your domain.
Start up your older BIND DNS server, and check that your Windows host can query the Windows DNS server for a host name (not an IP address!) defined on the Linux system, by querying your Windows DNS server.
Microsoft Windows [Version 6.1.7601]
Copyright (c) 2009 Microsoft Corporation.  All rights reserved.

C:\Users\seldon>nslookup olivaw
Server:  giskard.class.tu
Address:  10.0.2.200

Name:    olivaw.class.tu
Address:  10.0.2.202


C:\Users\seldon>nslookup solaria.cosc.tu
Server:  giskard.class.tu
Address:  10.0.2.200

Non-authoritative answer:
Name:    solaria.cosc.tu
Address:  10.0.2.12
Notice that when the Windows DNS server was queried about a host on .class.tu it gave an authoritative answer, but when queried about cosc.tu it gave a non-authoritative answer, as it had to forward the query.
Constructing a Windows domain
To add a computer to the domain, we work on the domain member, not the doman controller. The process is similar for each different type of Windows system.
For Windows XP, navigate My Computer (Right) / Properties / Computer Name / Change / Member of. Be sure that the name of the machine agrees with the DNS entry. You need an account with privileges on the domain controller. A reboot is required.
For Windows Vista, navigate Computer (Right) / Properties / Change Settings / (UAC) / Change / Member of. As before, be sure that the name of the machine agrees with the DNS entry; you still need an account with privileges on the domain controller, and a reboot is still required.
For Windows 7, navigate Computer (Right) / Properties / Change Settings / Change / Member of. As before, be sure that the name of the machine agrees with the DNS entry; you still need an account with privileges on the domain controller, and a reboot is still required.
For Windows 8, Navigate Metro (Right) / All Apps / Computer (Right) / Properties / Change Settings / Change / Member of. As before, be sure that the name of the machine agrees with the DNS entry; you still need an account with privileges on the domain controller, and a reboot is still required.
If the machine does not have a DNS entry, one will be created for it in Active Directory. It will even create both the PTR and the A records, provided the reverse lookup domain already exists.
Add at least two machines to your domain.
Log in to those machines using a domain account. Here is a screenshot logging into Windows 8 with a domain account:

Adding Linux Machines to a Domain
Linux systems can be added to a Windows domain. This can be done by directly working with Samba configuration files, though that is somewhat complex. There are third party tools to manage the process, but my (former) favorite no longer allows free downloads. One reasonable option are the tools provided by Centrify. They have agents for most flavors of Linux, and they are free- though registration is required.
Let’s put an Ubuntu system onto our domain. We start by downloading the proper agent; for this 32 bit Ubuntu system it is called centrify-suite-2013-deb5-i386.tgz. Unpack the tarball in a convenient directory, but be warned that this is a tarbomb, meaning that it drops all of its files in the current directory. If you do so in a directory that has other files, well, you too can spend some time cleaning up the wreckage.
Once you enter the subdirectory, you can start the install process by running the script install.sh. That script threw two warnings; one important and one not so much. It told me that only one DNS server had been provided in /etc/resolv.conf. This is true, but not a crisis; besides we haven’t set up our second domaind controller yet.
The second issue was that I was missing a required package: rpcbind. Of course that package depends on another package: libtirpc, and that package depends on another package: libssglue. There the trail stops, so we start by installing these three packages:
root@amadiro:/home/seldon/Desktop# dpkg -i ./rpcbind_0.2.0-4_i386.deb
libtirpc1_0.2.0-2_i386.deb libgssglue1_0.1-4ubuntu0.1_i386.deb
(Reading database ... 124234 files and directories currently
installed.)
Preparing to replace rpcbind 0.2.0-4 (using ./rpcbind_0.2.0-
4_i386.deb) ...
Unpacking replacement rpcbind ...
Preparing to replace libtirpc1 0.2.0-2 (using libtirpc1_0.2.0-
2_i386.deb) ...
Unpacking replacement libtirpc1 ...
Selecting previously deselected package libgssglue1.
Unpacking libgssglue1 (from libgssglue1_0.1-4ubuntu0.1_i386.deb) ...
Setting up libgssglue1 (0.1-4ubuntu0.1) ...

Setting up libtirpc1 (0.2.0-2) ...

Setting up rpcbind (0.2.0-4) ...
update-rc.d: warning: rpcbind start runlevel arguments (S) do not
match LSB Default-Start values (S 2 3 4 5)
 * Starting rpcbind daemon...                                            [ OK ]

Processing triggers for man-db ...
Processing triggers for ureadahead ...
Processing triggers for libc-bin ...
ldconfig deferred processing now taking place
Where can you get the software? I have put it on the class labserver; you can also get the packages directly from Ubuntu.
Next, we run the configuration script again
root@amadiro:/home/seldon/Desktop/Centrify# ./install.sh

*****                                                                 *****
*****             WELCOME to the Centrify Suite installer!            *****
*****                                                                 *****

Detecting local platform ...

Running ./adcheck-deb5-i386 ...
OSCHK    : Verify that this is a supported OS             : Pass
PATCH    : Linux patch check                              : Pass
PORTMAP  : Verify that portmap or rpcbind is installed    : Pass
PERL     : Verify perl is present and is a good version   : Pass
SAMBA    : Inspecting Samba installation                  : Pass
SPACECHK : Check if there is enough disk space in /var /usr /tmp
: Pass
HOSTNAME : Verify hostname setting                        : Pass
NSHOSTS  : Check hosts line in /etc/nsswitch.conf         : Pass
DNSPROBE : Probe DNS server 10.0.2.200                    : Pass
DNSCHECK : Analyze basic health of DNS servers            : Warning
         : Only one DNS server was found in /etc/resolv.conf.
         : At least one backup DNS server is recommended for
         : enterprise installations.
         : Only one good DNS server was found
         : You might be able to continue but it is likely that you
         : will have problems.
         : Add more good DNS servers into /etc/resolv.conf.

WHATSSH  : Is this an SSH that DirectControl works well with : Note
         : No SSH daemon running on this computer.

1 warning was encountered during check. We recommend checking this
before proceeding

WARNING: adcheck exited with warning(s).

With this script, you can perform the following tasks:
    - Install (update) Centrify Suite Enterprise Edition (License required) [E]
    - Install (update) Centrify Suite Standard Edition (License required) [S]
    - Install (update) Centrify Suite Express Edition [X]
    - Custom install (update) of individual packages [C]

You can type Q at any prompt to quit the installation and exit
the script without making any changes to your environment.

How do you want to proceed? (E|S|X|C|Q) [E]: x

Do you want to run adcheck to verify your AD environment? (Q|Y|N) [Y]:y

Please enter the Active Directory domain to check [company.com]: class.tu
Join an Active Directory domain? (Q|Y|N) [Y]:y
    Enter the Active Directory domain to join [class.tu]: class.tu
    Enter the Active Directory authorized user [administrator]: seldon
    Enter the password for the Active Directory user:
    Enter the computer name [amadiro.class.tu]:
    Enter the container DN [Computers]:
    Enter the name of the domain controller [auto detect]:
Reboot the computer after installation? (Q|Y|N) [Y]:n

You chose Centrify Suite Express Edition and entered the following:
    Install CentrifyDC 5.1.0 package: Y
    Install CentrifyDC-nis 5.1.0 package: N
    Install CentrifyDC-openssh 5.1.0 package: Y
    Install CentrifyDC-ldapproxy 5.1.0 package: N
    Install CentrifyDA 3.0.0 package: N
    Run adcheck                      : Y
    Join an Active Directory domain  : Y
    Active Directory domain to join  : class.tu
    Active Directory authorized user : seldon
    computer name                    : amadiro.class.tu
    container DN                     : Computers
    domain controller name           : auto detect
    Reboot computer                  : N


If this information is correct and you want to proceed, type "Y".
To change any information, type "N" and enter new information.
Do you want to continue (Y) or re-enter information? (Q|Y|N) [Y]:y

Running ./adcheck-deb5-i386 ...
NSHOSTS  : Check hosts line in /etc/nsswitch.conf      : Pass
DNSPROBE : Probe DNS server 10.0.2.200                 : Pass
DNSCHECK : Analyze basic health of DNS servers         : Warning
         : Only one DNS server was found in /etc/resolv.conf.
         : At least one backup DNS server is recommended for
         : enterprise installations.
         : Only one good DNS server was found
         : You might be able to continue but it is likely that you
         : will have problems.
         : Add more good DNS servers into /etc/resolv.conf.

WHATSSH  : Is this an SSH that DirectControl works well with : Note
         : No SSH daemon running on this computer.

DOMNAME  : Check that the domain name is reasonable          : Pass
ADDC     : Find domain controllers in DNS                    : Pass
ADDNS    : DNS lookup of DC giskard.class.tu                 : Pass
ADPORT   : Port scan of DC giskard.class.tu                  : Pass
ADDC     : Check Domain Controllers                          : Pass
ADDNS    : DNS lookup of DC giskard.class.tu                 : Pass
GCPORT   : Port scan of GC giskard.class.tu                  : Pass
ADGC     : Check Global Catalog servers                      : Pass
DCUP     : Check for operational DCs in class.tu             : Pass
SITEUP   : Check DCs for class.tu in our site                : Pass
DNSSYM   : Check DNS server symmetry                         : Pass
ADSITE   : Check that this machine's subnet is in a site known by AD
: Pass
GSITE    : See if we think this is the correct site          : Pass
TIME     : Check clock synchronization                       : Pass
ADSYNC   : Check domains all synchronized                    : Pass
1 warning was encountered during check. We recommend checking this
before proceeding

WARNING: adcheck exited with warning(s).
Selecting previously deselected package centrifydc.
(Reading database ... 124241 files and directories currently installed.)
Unpacking centrifydc (from .../centrifydc-5.1.0-deb5-i386.deb) ...
Selecting previously deselected package centrifydc-openssh.
Unpacking centrifydc-openssh (from .../centrifydc-openssh-6.0p1-5.1.0-
deb5-i386.deb) ...
Setting up centrifydc (5.1.0-497) ...

Processing triggers for ureadahead ...
Processing triggers for man-db ...
Setting up centrifydc-openssh (6.0p1-5.1.0.472) ...

Joining the Active Directory domain class.tu ...
Using domain controller: giskard.class.tu writable=true
Join to domain:class.tu, zone:Auto Zone successful

Centrify DirectControl started.
Loading domains and trusts information

Initializing cache
.
You have successfully joined the Active Directory domain: class.tu
in the Centrify DirectControl zone: Auto Zone


You may need to restart other services that rely upon PAM and NSS or simply
reboot the computer for proper operation.  Failure to do so may result in
login problems for AD users.


Install.sh completed successfully.
I was able to reboot the system and then login as a domain user

I did have one problem, when there was a domain user (seldon) that was the same as a local user (seldon). Attempting to log in as seldon caused no end of trouble
The installation on a CentOS system was also quite simple, though some simple changes were recommended (and made) to how the SSH server is configured. I also made sure I did not have a local user with a duplicate name on the domain controller. One fun feature of the SSH configuration changes was that I could SSH from one Linux host on the domain to another without re-authenticating.
hardin@amadiro:~$ ssh venabili.class.tu
CentOS release 6.2 (Final)
Kernel 2.6.32-220.el6.x86_64 on an x86_64

Last login: Sat Feb  2 15:53:53 2013 from amadiro.class.tu
[hardin@venabili ~]$
Working with Active Directory
Review the default domain users and groups in your domain controller. The information & settings can be found by navigating Server Manager → Roles → Active Directory Domain Services → Active Directory Users and Computers → “DomainName” → Users
- How many users does your DC possess at boot?
- How many are active?
- How many groups does your DC possess at boot?
- How many groups have members?
- Does your initially created user belong to a different set of groups than the administrator?
Add additional users to your DC. Place them in a variety of groups. Verify that these accounts work by using them to log on to client machines.
To create these users, from Active Directory Users and Groups, right-click then select New → User. From the resulting dialog box, you can choose the name and password for that account.

OUs
In Active Directory, an organizational unit (OU) is a container for users, groups, and computers. OUs can be created around roles, around geography, around the structure of the company/organization, or around any other convenient set of distinctions.
Imagine that you are in charge of the IT staff for a small company, with a main office and three branch offices. Your company has a sales staff, a production staff, a research & development team, and an IT team. Construct three different potential OU hierarchies. What are the advantages and disadvantages of each?
To illustrate these ideas, we will create two OUs, one for the sales staff and one for the production staff. We can do the same for computers as well.
To create the OUs, navigate Start → Administrative Tools → Active Directory Users and Computers. Then navigate Active Directory Users and Computers → “Domain_Name” (right click) → New → Organizational Unit.
For each OU you create, you need to specify the name. If you leave the check box “Protect container from accidental deletion” checked, well, then deleting the OU becomes a bit of a pain.
What? You created an OU with that box checked and now you want to delete it?
- Log on to an account that is a domain admin.
- Go to Active Directory Users and Computers
- Right-click on “Active Directory Users and Computers”
- Select View -> Advanced Features
- Navigate the tree (which is now larger), right-click on the OU and select properties.
- From the Security tab, select Advanced.
- The (usually first) entry is a Deny Everyone permission; Remove it.
- Go back to the OU name in the Active Directory Users and Computers tree; right-click and select Delete.
- Uncheck the Advanced Features in the View sub-menu if you wish.
Create at least one user in the Sales OU and one user in the Production OU.
Test the result.
Note that a user / group / computer can only be in one OU.
Note that the collection of domain controllers (seen in Active Directory Users and Computers) is also an OU- note the folder icon is the same as for the other OUs you have created.
Delegating and OUs
We can use groups within an OU as a way to delegate privileges. In the sales OU, create a new “admin” user. We want to enable the “admin” user to be able to handle passwords, password resets and do simple user management, but only in the sales OU. How do we do this?
Create a group inside the Research Users OU; call it Research Admins. The group scope can remain global; the group type should be Security. Add the “admin” user to the Research Admins group inside the Research Users OU. Note that, despite the name, this is a simple unprivileged user.

To give users inside the Sales Admins groups some privileges, right-click on the Sales OU, and select Delegate Control. A Wizard starts, called the delegation of control wizard. Select the Research Admins group (Select Add, and type the name). Delegate some common tasks- say Create, delete and manage user accounts and Reset user passwords and force password change at next logon.

Though now the members of the Research Admins group have these privileges, how can they be used? We did not grant these admins the right to log on to the
domain controller, did we? And would that be a good thing?
What happens next depends if we are in Windows Vista, Windows 7, or Windows 8.
In Vista (with SP1 or greater), We must install the Remote Server Administration Tools (KB 941314). This is available online and on the lab share. Open Control Panel, click Programs, and then click Turn Windows features on or off under Programs and Features. If you are prompted to provide permission by User Account Control, click Continue. In the Windows Features dialog box, select the remote administration snap-ins and tools that you want to install, and then click OK.
If you wish, you may configure the Start menu to display the Administration Tools shortcut. [This is done on a per-user basis- so setting this up for one user does not set it up for all users.] Right click Start, and then click Properties. On the Start Menu tab, click Customize. In the Customize Start Menu dialog box, scroll down to System Administrative Tools, and then select Display on the All Programs menu and the Start menu. Click OK. Shortcuts for snap-ins installed by RSAT are added to the Administrative Tools list on the Start menu.
Log into your Vista machine using the Research Admin user. From administrative tools, open Active Directories Users and Computers. From here, you are now able to e.g. enable and disable the account of the regular user(s) from the Research OU.
In Windows 7, the process is essentially similar, though a different software package (KB958830) is used to install the Remote Server Administration Tools, and you need to determine precisely which remote administrative tools you want to enable.
In Windows 8, the process is also similar, though you do not have to modify any Windows Features, and now you end up with two programs on your Start Menu. The first is called administrative tools, and works essentially the same way as the previous versions; here is a screen shot.

The second is called Server Manager, but we will not cover that tool in this class.
Verify that your Sales admin user has the delegated properties.
Group policy
Group policies are used to create and enforce different policies, including security related policies. Group policies are either local to the machine, or are based on Active Directory.
To modify the local GPO for a machine, run the command gpedit.msc either from the run box or directly from the command line. To see the local GPO for a machine, let’s test it out on a Vista machine that is not connected to a domain.
- What software setting are present by default?
- Are there any startup or shutdown scripts?
- What are the default password policies?
- What are the default account policies?
- What is the default audit policy?
- What is the significance of this from the point of view of the security of your system?
- Which users can change the system time?
- Modify this setting and test it.
- Can you rename the administrator account?
- Do it. [Hmm. I guess this probably tells you the answer to the above question. Shrug.]
- How is the Windows Firewall configured?
- What information does the Network List Manager provide?
- What software restriction policies are set by default?
- Can you set disk quotas in Windows? If so, how?
Because Group Policies can be set at different levels, it is important to know the order of precedence. It is:
- Local GPOs apply first
- Site-linked GPOs apply next
- Domain-linked GPOs apply next
- OU-linked GPOs apply last.
Note also that the “last writer wins”.
To modify domain and GPO level policies, run the Group Policy Management Tool on the domain controller (Start → Administrative Tools → Group Policy Management). Select the Default Domain Policy- follow the tree- Group Policy Management → Forest (in the example this is class.tu) → Domains → “Domain_name” (in the example this is class.tu) → Default Domain Policy, then visit the Settings tab. [You may receive a warning from Internet Explorer that you are viewing potentially unsafe websites.]

The entry we clicked above is actually a link to a Group Policy Object that can be found farther in the tree, under Group Policy Objects → Default Domain Policy.
GPOs can be filtered via security filters and via WMI filters; we will not cover these.
What are the settings in the default domain policy?
Who can modify the default domain policy? What can others do?
Creating our own GPOs
As an example, let us create a GPO that disables the screen saver controls for a user. From the collection of Group Policy Objects, select “New”. Name the policy whatever you wish; in the example I will call it “ScrenSaver”. We will not use a Source Starter GPO.

Select the policy, and view the settings. Note that initially no settings have been made. Right-click in the settings window to bring up the Group Policy Management Editor The resulting editor is very similar to the editor we saw for local policy.
At this point, we see our first differences between Windows Server 2008 and Windows 2008 Server R2, as the precise locations appear to have changed between 2008 and 2008 R2. In Server 2008 to make the change, navigate through User Configuration → Policies → Administrative Templates → Control Panel → Display. Double-click on the Hide Screen Saver tab and set it to “Enabled”.
On the other hand, in Server 2008 R2, that entry is not there. Instead, take a look at User Configuration → Policies → Administrative Templates → Control Panel → Personalization → Prevent changing screen saver. Set that value to “Enabled”.
Be sure to read the Explain Tab
Be sure to add some comments to the Comment tab- after all we all comment our code carefully, don’t we?

Exit the Group Policy Management Editor [No, you don’t have a “Save” button.]
From the Group Policy Management console, note that apparently no changes have been made. Right click on the settings window and select “Refresh”; at ths point the changes you have already made in the GPO will become visible.

To apply this policy to a group, select an OU, (say the sales OU) and right-click; select Link an Existing GPO, then select the GPO you developed and select OK.
GPOs are pulled by the client from the server. This happens on a regular basis, but it is not immediate. The client will update their GPO settings on login, so you can refresh the set by logging off and back on. The client can also update their policy set manually by running the command gpupdate from either the command line or from the Run box.
C:\Users\salesadmin>gpupdate
Updating policy...

Computer Policy update has completed successfully.
User Policy update has completed successfully.
Verify that your settings have been applied to the client- you should no longer be allowed to modify the settings for the screensaver.
GPOs can also be applied to an entire site (a collection of forests, which are collections of domains). We do not consider this further here.
Suppose that we want to have our policy apply to all elements of the domain. Create another GPO object as above; now we are going to hide the Desktop settings for users. From the Group Policy Management Editor, navigate User Configuration → Policies → Administrative Templates → Control Panel → Display → Hide Settings tab (Hide Desktop in Windows 2008 not 2008 R2).
From the Group Policy Management window, right click on the domain name, and “Link to an Existing GPO”.

Test your changes by examining both the computer that was in your production OU and a computer in the sales OU. Note that gpupdate or a log in (after log out) may be required.
Notice that the changes occur regardless of the user- even if you log in as a domain admin, you will not see the Desktop settings tab.
When deleting a GPO for an OU you can either delete the GPO, or just its link to that OU (so it can be saved and used on another OU for example). To delete the link, select the GPO in the OU, and delete. To delete the GPO, go to Group Policy Objects and delete the rule.
Adding a second domain controller
If you are starting with the lab image, CHANGE THE ADMINISTRATOR PASSWORD!
Set up a static IP address and name for the backup; use the primary DNS server for DNS. Set up the name of the new server. Join the new machine to the old domain; this will add the name information to the DNS server.
Use the Add Roles Wizard to install Active Directory Domain Services on the controller. When the wizard completes, run dcpromo.exe (e.g. from the link). Select Add a domain controller to an existing domain (from Existing forest.) Select the domain; since we have only created one domain use that as the domain.
For the site, we use the default, which has the clever name “Default-First-Site-Name”.
Under additional domain controller options, be sure that both DNS server and Global catalog are checked.
Note that the setup will then tell you that an authoritative parent zone cannot be found- not surprisingly, since we are creating our own top-level domain without a parent. We do want to continue at this point…
The remaining questions can be answered in the same way we answered them for the first DC.
Take a look at the DNS settings. Note that the forward and reverse zones from the primary will have been duplicated, but not the conditional forwaders; these need to be added manually.
The settings for DNS servers on domain members are not automatically updated with the location of your new DNS server; this must be done manually on each client.
Test your new DC by shutting down the original DC; be sure that your services (AD, DNS) are still available.
Common Services
When fully configured, a Windows 2008 server will be running a number of services that will listen on a wide range of ports. Fortunately, Microsoft has provided a guide to the ports used by various services running on a Windows 2008 server.
Windows 2003 Server
Windows 2003 Server, especially Windows Server 2003 R2 is still a commonly used server. However, we do not have time to cover it this week. I encourage you to experiment with it- it will make a nice surprise for the other teams during the exercises.
 Darknet
- Best EDR Of The Market (BEOTM) – Endpoint Detection and Response Testing Tool
- AgentSmith HIDS – Host Based Intrusion Detection
- padre – Padding Oracle Attack Exploiter Tool
- Privacy Implications of Web 3.0 and Darknets
- DataSurgeon – Extract Sensitive Information (PII) From Logs
- Pwnagotchi – Maximize Crackable WPA Key Material For Bettercap
- HardCIDR – Network CIDR and Range Discovery Tool
- Socialscan – Command-Line Tool To Check For Email And Social Media Username Usage
- CFRipper – CloudFormation Security Scanning & Audit Tool
- CredNinja – Test Credential Validity of Dumped Credentials or Hashes
Windows Security
- An error has occurred; the feed is probably down. Try again later.
Security Focus Vulnerabilities
- An error has occurred; the feed is probably down. Try again later.
Security Bloggers Network
- An error has occurred; the feed is probably down. Try again later.
Krebs on Security
- Patch Tuesday, May 2024 Edition
- How Did Authorities Identify the Alleged Lockbit Boss?
- U.S. Charges Russian Man as Boss of LockBit Ransomware Group
- Why Your VPN May Not Be As Secure As It Claims
- Man Who Mass-Extorted Psychotherapy Patients Gets Six Years
- FCC Fines Major U.S. Wireless Carriers for Selling Customer Location Data
- Russian FSB Counterintelligence Chief Gets 9 Years in Cybercrime Bribery Scheme
- Who Stole 3.6M Tax Records from South Carolina?
- Crickets from Chirp Systems in Smart Lock Key Leak
- Why CISA is Warning CISOs About a Breach at Sisense
