Etudes 02- Nessus
Installing the Nessus server
In this example, we will install Nessus on CentOS 6.2 (x86_64). To do so, we start with the rpm Nessus 4.4.1-es6.x86_64.rpm and intsall it in the usual fashion with the rpm command as root:
[root@localhost ~]# rpm -ivh /home/vimes/D
Desktop/   Documents/ Downloads/
[root@localhost ~]# rpm -ivh /home/vimes/Desktop/Nessus-4.4.1-es6.x86_64.rpm
Preparing...                ########################################### [100%]
   1:Nessus                 ########################################### [100%]
nessusd (Nessus) 4.4.1 [build M15078] for Linux
(C) 1998 - 2011 Tenable Network Security, Inc.

Processing the Nessus plugins...
[##################################################]

All plugins loaded
 - Please run /opt/nessus//sbin/nessus-adduser to add a user
 - Register your Nessus scanner at http://www.nessus.org/register/ to obtain
   all the newest plugins
 - You can start nessusd by typing /sbin/service nessusd start
Nessus requires users to register for a plugin feed and then to update the plugins before Nessus will start; thus this needs to be done on a computer with a functioning internet connection- so we cannot complete the installation from within the classroom laboratory.
If you want to set up Nessus on your own, you must select either the Home Feed, which is available at no charge, or the Professional Feed, which allows the tool to be used in a commerical setting. Note that there are significant restrictions on the use of the Home Feed.
After having obtained an activation code for our feed, we can begin to configure Nessus.
Nessus uses a client-server arcitecture, and clients must authenticate to the Nessus server via a Nessus user. Thus, we start by creating our first Nessus user using the command /opt/nessus/sbin/nessus-adduser:
[root@localhost ~]# /opt/nessus/sbin/nessus-adduser
Login : Fred
Login password :
Login password (again) :
Do you want this user to be a Nessus 'admin' user ? (can upload plugins, etc...) (y/n) [n]: y
User rules
----------
nessusd has a rules system which allows you to restrict the hosts
that Fred has the right to test. For instance, you may want
him to be able to scan his own host only.

Please see the nessus-adduser manual for the rules syntax

Enter the rules for this user, and enter a BLANK LINE once you are done :
(the user can have an empty rules set)


Login             : Fred
Password         : ***********
This user will have 'admin' privileges within the Nessus server
Rules             :
Is that ok ? (y/n) [y] y
User added
Here we have created the user “Fred” as a Nessus admin user. When prompted for additional rules for our admin user, we simply pressed return, and so added no additional rules.
Next we use the activation code we received for our feed, and register Nessus:
[root@localhost ~]# /opt/nessus/bin/nessus-fetch --register XXXX-XXXX-XXXX-XXXX
Your activation code has been registered properly - thank you.
Now fetching the newest plugin set from plugins.nessus.org...
Your Nessus installation is now up-to-date.
If auto_update is set to 'yes' in nessusd.conf, Nessus will
update the plugins by itself.
where XXXX-XXXX-XXXX-XXXX was replaced by my real activation code.
When this completes, we can verify that the necessary plugin set has been retrieved by running
[root@localhost ~]# cat /opt/nessus/lib/nessus/plugins/plugin_feed_info.inc
PLUGIN_SET = "201201021137";
PLUGIN_FEED = "HomeFeed (Non-commercial use only)";
From this, we see that we have downloaded the Home Feed, from January 2, 2012.
At this point, we can start the Nessus server by simply running
[root@localhost ~]# /sbin/service nessusd start
Starting Nessus services:
Our Nessus server is now working.
If we later want to update our plugin data (without changing our activation code), we can simply run
[root@localhost ~]# /opt/nessus/sbin/nessus-update-plugins
Fetching the newest updates from nessus.org...
Done. The Nessus server will restart when its scans are finished
Running a Scan
Let us suppose that we want to run a Nessus scan against a target.
To do so, we will use the web interface to the Nessus server. This lets us control our scans from machines other than the Nessus server itself. The Nessus web server listens on TCP/8834, so we must first modify our firewall to allow traffic from our controller to the Nessus server on that port.
In CentOS 6.2, we can do this from the Firewall Configuration tool, which is accessible from the System menu. Simply select “Other Ports” choose TCP/8834, and then select “Add”.
From the client we are using to control the server, we use a web browser to connect to the server on the proper port. Note however, that Nessus uses TLS to encrypt the data to/from the server, so we must specify https as the protocol, rather than simple http. In this example, I have set the Nessus server up on 192.168.1.125, so from a web browser I visit
https://192.168.1.125:8834
Our first visit will result in a warning that the certficate used to secure the connection is not trusted.
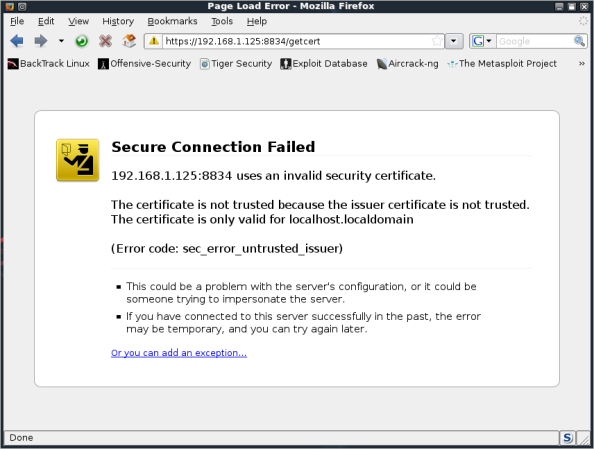
Since we are only interested in testing the system, we will simply accept the warning, and add the necessary exception. We can solve the problem permanently by modifying the certificate files located at
/opt/nessus/com/nessus/CA/servercert.pem
/opt/nessus/var/nessus/CA/serverkey.pem
See the
Nessus Installation Guide, pp. 64-65.
Note that the Nessus web server requires Flash;
Once we connect to the server, we are asked to provide authentication credentials.

We use the user Fred and the password that we specified earlier. Note that the user name is case sensitive.
To run our first scan, we begin by creating a policy. This will determine not only the target of our scan, but also the different tests that will be performed as well as any credenitals that are required.
From the main menu, select Policies; you will then be presented with four default policies.

Select Add to create a new policy. We could use one of the existing policies as a template by using the Copy button. For clarity in this example, we create a new policy from scratch.
After using the Add button to create the new policy, we are presented with a window with four tabs that describe the policy-
- General
- Credentials
- Plugins
- Preferences
We shall describe some of the important options on each tab. A more complete description of these options is available in the Nessus User Guide.
The General tab has a number of boxes that describe the overall structure for the scan to be performed. In the Basic box, you must enter a name for the scan, and it is helpful to enter a more detailed description. By default, the scan is private, meaning other Nessus users cannot use the same scan. Only administrative users can create Shared scans that other users can use.
Hovering the mouse over the options in the other boxes will show a pop-up that briefly describes the purpose of the option.
The options in the Port Scanners box should be tuned to the type of target that will be scanned. If SNMP is not enabled on the planned targets, it is unnecessary. The netstat scan options rely either on an SSH connection or a WMI connection to the target; both of these options would require appropriate credentials.
The Port Scan Options box allows the user to determine what ports will be scanned. The default port scan range, is, unsuprisingly “default”. The file
/opt/nessus/var/nessus/nessus-services
contains the ports that are scanned by default; currently it contains 8999 ports, 4605 TCP ports and 4394 UDP ports. You can also specify “all” which will scan all ports; you can specify a custom list of ports and port ranges combining commas (“,”) and dashes (“-“), e.g. 1-1024,8080,8834.
The Performance box contains the settings that determine the overall impact of the scan on the underlying network. Setting these values too aggressively may result in the Nessus scan degrading or overwhelming your network performance.
Hitting the Next button will take you to the Credentials tab. It is important that you have the proper credentials for the system(s) that you plan to scan. As an example, I ran a scan against a stock Windows XP SP3 machine with no additional installed software. Running the scan without credentials identified 25 issues, with two listed as high severity (MS08-067 and MS09-001). The same scan with valid credentials returns 274 issues, with 166 listed as high severity.
As an aside, if you decide to test against a Windows XP system, you need to turn off “Simple File Sharing” to successfully use your SMB credentials. To do so, open My Computer, then from the menu select Tools, then Folder Options. Select the View tab, and scroll to the bottom; unselect “Use simple file sharing (Recommended)”. 
Returning to our study of Nessus, there are four types of credentials that can be provided; the type is selected from a drop down box, and the available options are
- Windows credentials
- SSH settings
- Kerberos configuration
- Cleartext protocols settings
The Windows credentials section lets you sepcify up to four accounts and passwords. You can specify the password itself, but you could also provide either the corresponding LM or NTML hash, if available.
The SSH credentials section lets you specify a single user and either the user’s SSH password or their SSH keys to authenticate to an SSH server. You can also specify how that user can escalate privileges, using su, sudo, or a combination.
Kerberos credentials can be provided in the corresponding section.
The final section covers the use of passwords that are passed in plan text, including telnet, rsh, and rexec. It is the case that the Nessus will store these credentials securely; the reside in the .nessus file which is encrypted. However these credentials are passed in plain text, so that anyone with access to the network traffic will be able to recover these passwords; as such their use is not recommended.
The next policy tab lets you select the plugins that the scan will use. These plugins are organized into 42 families; some of the families are particular to operating systems (e.g. FreeBSD, MacOS), others to particular hardware (e.g. Cisco, Juniper), others to particular services (e.g.DNS, Databases) and others are more general. Some thought should go in to the selection of the particular plugins enabled in a scan. There is no need to enable scanning for Cisco vulnerabilities when the target is known to be a Windows 2008 server.
The last policy tab sets the preferences for the various plugins that are being used. As an example, you can specify the login, password, and database types of the databases that are going to be scanned. Details of the (many) options can be found at the Nessus User Guide.
With your policy completed, the next step is to initiate a scan. Click on the Scan menu at the top of the page, and then select the Add button. From here you first give the scan a name. Using the Home Feed, we cannot create a Scheduled scan, so we use the default type, “Run Now”.
From the Policy drop down, we select the policy we want to use in the scan; we can use one of the default policies or one that we have created ourselves.
The Scan Targets can be chosen by IP address, by IP Range (e.g. 192.168.1.100-105), by netblock (e.g. 192.168.1.0/24) or by host name (e.g.test.domain.com). Multiple hosts can be specified on multiple lines.
If preferred, a list of hosts can be specified as na ASCII text file, with one host per line, and specficied in the Target File box.
Once the Run Scan button is pressed, you will return to a list of all of the active scans; you can see the scan name, the owner, it status, and when the scan started. Even for a single host, a scan can take some time, so be patient.
Selecting the Reports option from the main menu, you will be presented with a list of the available reports. If you scan has not yet been completed, its status will be listed as Running. Browsing a report that is running will take you to a report page that will show the current progress of the scan.
Once complete, the reports can be viewed directly in the browser. The results can be filtered by host, port, and severity. The results of the report can be exported in a number of formats via the download buttonl supported formats include HTML and .rtf; the latter can then be directly imported into Word and LibreOffice documents.
Exercises
- Set up Windows XP SP3 machine, with a default install. Scan it for vulnerabilities.
- Run the scan without providing credentials. What are your results?
- Repeat the scan, but provide administrator level credentials. What are the differences?
- Set up and scan a CentOS 5.5 machine.
- Again, run the scan without providing credentials, and examine the results.
- Repeat the scan, but with root credentials for SSH. What differences do you notice?
Much more can be done with Nessus than this simple example, but hopefully this will give you a place to start.
 Darknet
- Best EDR Of The Market (BEOTM) – Endpoint Detection and Response Testing Tool
- AgentSmith HIDS – Host Based Intrusion Detection
- padre – Padding Oracle Attack Exploiter Tool
- Privacy Implications of Web 3.0 and Darknets
- DataSurgeon – Extract Sensitive Information (PII) From Logs
- Pwnagotchi – Maximize Crackable WPA Key Material For Bettercap
- HardCIDR – Network CIDR and Range Discovery Tool
- Socialscan – Command-Line Tool To Check For Email And Social Media Username Usage
- CFRipper – CloudFormation Security Scanning & Audit Tool
- CredNinja – Test Credential Validity of Dumped Credentials or Hashes
Windows Security
- An error has occurred; the feed is probably down. Try again later.
Security Focus Vulnerabilities
- An error has occurred; the feed is probably down. Try again later.
Security Bloggers Network
- An error has occurred; the feed is probably down. Try again later.
Krebs on Security
- Russian FSB Counterintelligence Chief Gets 9 Years in Cybercrime Bribery Scheme
- Who Stole 3.6M Tax Records from South Carolina?
- Crickets from Chirp Systems in Smart Lock Key Leak
- Why CISA is Warning CISOs About a Breach at Sisense
- Twitter’s Clumsy Pivot to X.com Is a Gift to Phishers
- April’s Patch Tuesday Brings Record Number of Fixes
- Fake Lawsuit Threat Exposes Privnote Phishing Sites
- ‘The Manipulaters’ Improve Phishing, Still Fail at Opsec
- Thread Hijacking: Phishes That Prey on Your Curiosity
- Recent ‘MFA Bombing’ Attacks Targeting Apple Users
